How to use Tmux in Linux

Tmux is a so called terminal multiplexer and a good alternative to GNU Screen. Like its alternative you can start a Tmux session and open multiple windows inside a session. You also have the oportunity to split windows or to change its size, or even define custom layouts, which we will also cover in this article. It can be used to switch between programs or terminals and let them run in the background. The session itself are persitent, that means that programs inside a session can basically run forever, even after disconnection from your server.
It is also used for pair programming and is also a quite popular choice for people who love the command line. Some people use Tmux in combination with vim to replace an IDE.
NOTE Another quite popular used terminal multiplexer is
screen. If you want to learn more aboutscreenand its differences to Tmux you can check out our tutorial here.
Installing Tmux on Linux
Unlike screen Tmux is usually not preinstalled on the system. The easiest way to install Tmux on your Linux is by using the package manager for your disto.
Install Tmux on Ubuntu or Debian
To install tmux on Ubuntu or Debian we can use the package manager apt.
sudo apt install tmux
Install Tmux on CentOS or Fedora Linux
For CentOS or Fedore like distrobution we recommend yum.
sudo yum install tmux
Install Tmux MacOSX
On mac we can use brew to install packages like Tmux.
brew install tmux
Starting Tmux
To start a new Tmux session, we can simply type tmux into the command line.
tmux
This command starts a new shell inside a tmux window.
You may notice the status line a the bottom of your terminal, this shows some information about the current tmux session. You have also the possibility to change its looks and layout, if you like, but more on that later in this tutorial.
All commands in Tmux use the prefix Ctrl+b.
Please note that you need to “press and hold the
Ctrlkey. So that means that you need to pressCtrlandbat the same time, followed by the command key.
If you want a list of all commands available, you can type:
Ctrl + b ?
This will print out a list of all commands you can use.
Creating named Tmux Sessions
Tmux sessions are named numerically by default (0-9). However named sessions can still be useful, especially when you run multiple Tmux sessions at the same time. We can create a named session, by running the following command:
tmux new -s tmux_session_name
Its recommended to choose a descriptive session name.
Detach Tmux Session
To detach a session and let programs or terminals run in the background you can use:
Ctr+b d
Re-attach Tmux Session
To re-attach to a session, we need to know the session name of the session we want to attach. To get a list of all currently active sessions we can type:
tmux ls
This should output something similar to this:
0: 1 windows (created Sat Sep 15 10:48:43 2020) [168x35]
named_session: 1 windows (created Sat Sep 15 10:13:11 2018) [78x35]
This will list all of our current sessions. Each line starts with its name followed by : and some additinal information. As you can see in the example above we have 2 sesions running, the firstone given the default name 0 and the second is named named_session.
To attach to the named_session, we can type:
tmux attach-session -t named_session
Splitting Panes
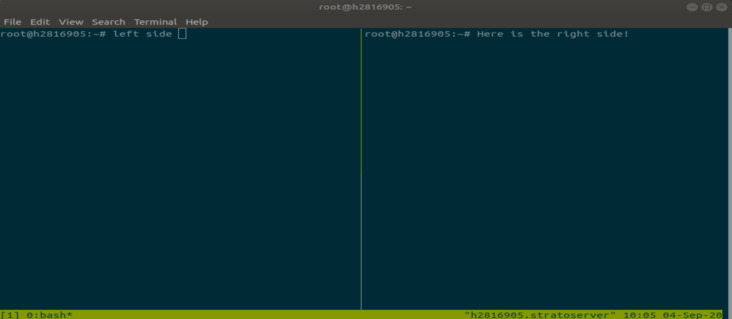
After we created our first session, I’m going to show you, how to manage Panes and Windows in Tmux. When we start our session, by default Tmux will start one window with a single panel inside. The shortcut to split panes horizontally is C-b %.
{0xc00041e1b8 732 319}

As you can see the command will split the panels left and right. Theres also the option to split the pane into top and bottom panes (vertically). To split vertically we can use the Ctr-b " command.
Navigation Panes
If you have multiple panes open, you want of course be able to switch them. This can easily done by using the prefix key followd by the arrow keys. Where the arrow key is the arrow key pointing to the pane you want to switch to. So if for example you want to switch to the left pane, you can use Ctr-b left-arrow-key.
Instead of the arrow keys you can also use vim keybinding to navigate around your Tmux Panes. Tmux uses the hjkl keys to navigate around. So instead of using the left arrow key you can also use Ctr-b + h to navigate to the left side of the pane.
Closing Panes
To close a pane you can either type exit into the terminal window or use the shortcut Ctrl-d.
Ctrl-b + d
Creating Windows in Tmux
Windows in Tmux are like virutal desktops, just for terminals instead of workspaces. Creating a new window within a session you can type: Ctrl-b + c. Now you have a new terminal windows, where you can also split as you like.
To switch to the previous window you can use Ctrl-b+ p. To switch to the next windows use Ctrl-b+n. If you have multiple windows open you can also navigate by using the numeric number displayed in the status bar, so if you like to go to the first window you can type Ctrl-b+0.
Tmux Cheat Sheet
Here are some useful commands for getting started with Tmux:
| Command | Description | |
|---|---|---|
Ctrl+b c |
This will create a new Shell window | |
Ctrl+b A |
Get a list of all active windows | |
Ctrl+b , |
Rename the current active window | |
Ctrl+b % |
Split Horizontally | |
Ctrl+b ` |
` | Split vertically |
Ctr+b o |
Switch focus of panel to the next | |
Ctrl+b ; |
Toggle between next and previous panel | |
Ctrl+b Q |
Close all panel but active one | |
Ctrl+b x |
Close the current panel | |
Ctrl+b d |
Detach the session |
Customize Tmux
Tmux is highly customizable and you can do a lot of awesome things with it. In this article we only scrape on the surface on what you can actually do. If you want to learn more you can chek out Brian Hogans book on tmux. There are also a lot of people blogging about Tmux and sharing their dotfiles on Github.
When Tmux starts, it reads its configuration from the ~/.tmux.conf file in your home directory. Here you can configure additional options like customize the status bar or set the history scrollbar.
Here you can see an example configuration file:
### Improve colors
set -g default-terminal 'screen-256color'

### Set scrollback buffer to 10000
set -g history-limit 10000

### Customize the status line
set -g status-fg  green
set -g status-bg  black
Conclusion
In this article you have learned how to get started with Tmux. You learned how to start a session, how to create and navigate through windows, as well as how to split panels and personalize your Tmux appearance by configuring the tmux.conf file.
To learn more about Tmux check out its man page
If you have any feedback or questions, please leave them in the comment section down below.